ARROW-LOK Digital Fusion System – Instructions For Use
DESCRIPTION
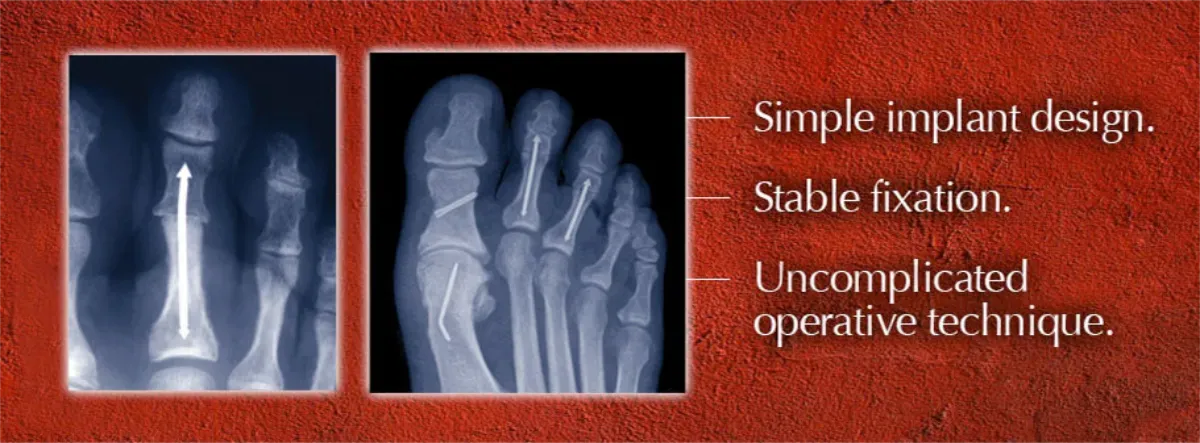
The ARROW-LOK implant features a three-dimensional arrow shape at each end joined by a solid shaft. The implants are available in multiple lengths and in 2 different angles. The implant is manufactured from stainless steel per ASTM F138.
INDICATIONS
The ARROW-LOK implant is indicated for fixation of osteotomies, arthrodeses and reconstruction in the lesser toes following corrective procedures. It is not intended for use in the spine.
CONTRAINDICATIONS
- Comminuted bone surfaces that may prevent correct device placement.
- Pathological conditions of bone such as osteopenia or tumor which would impair the ability of the bone to securely engage the device.
- Sensitivity of the patient to metals used in implant alloys.
- Infection of either bone or soft tissue.
- Conditions which tend to limit the patient’s ability or willingness to restrict activities or follow directions during the healing period.
- A patient presenting a phalanx with a diameter of the intramedullary canal measuring less than 1.6mm, the diameter of the implant shaft.
WARNING
The ARROW-LOK implant has not been evaluated for safety and compatibility in the MR environment. The ARROW-LOK implant has not been tested for heating or migration in the MR environment.
PRECAUTIONS
PREOPERATIVE PRECAUTIONS
- The surgeon must evaluate each patient’s clinical presentation when determining implant selection as correct selection of the implant is extremely important.
- Prior to performing surgery, the surgeon must be familiar with the implant, instruments, and surgical procedure. If needed, the surgeon should contact the manufacturer for surgical technique information.
- The ARROW-LOK implant should be used in accordance with its labeled indications and the manufacturer’s instructions for use, especially during insertion and removal.
- During the patient evaluation, the surgeon must consider the ability and willingness of the patient to follow post operative instructions regarding weight bearing and activity levels.
- The surgeon should explain the surgical risks and possible adverse effects to the patient. The patient should be warned that the ARROW-LOK implant does not replace healthy normal bone and that the implant can become damaged or fracture as a result of certain activities or trauma and subsequently may need to be removed. The surgeon should also advise the patient of any other risks that the surgeon believes should be disclosed.
- Inspect devices prior to surgery for damage during storage or shipment.
INTRAOPERATIVE PRECAUTIONS
- The ARROW-LOK Reamer, Depth Gauge, Broach and Insertion Forceps are available and must be used as suggested by the manufacturer to assure the accurate implantation of the implant.
- While rare, extensive use or excessive force may cause breakage of instruments. Instruments should be examined for wear or damage prior to surgery.
- Patient should be immobilized during implantation.
- Using aseptic OR technique, remove device from the package only after the correct size has been determined and the operative site has been prepared for final implantation. Always avoid contact with hard objects that may damage the product and handle the product with powder-free gloves.
- The ARROW-LOK implant is for single-use only and should never be reused. Reuse of these devices may seriously harm the patient.
- The device should never be reused or re-sterilized after contact with body tissues or fluids. The manufacturer does not take any responsibility for the use of implants re-sterilized after contact with body tissues or fluids.
POSTOPERATIVE PRECAUTIONS
- The surgeon must advise the patient of the need for protection of the implant from full weight bearing until adequate fixation and healing have occurred.
- Periodic follow-up is recommended to monitor the implant position as well as the bone condition. Post-op x-rays should be taken periodically to compare with early post-op conditions to detect long term evidence of implant loosening, cracking, bending, or changes in position.
ADVERSE EFFECTS
The following device-related adverse effects may occur:
- Allergic reactions to materials or metal sensitivity.
- Pain.
- Infections, both deep and superficial.
- Device fracture or migration.
Additional adverse effects may occur related to general surgical procedures (delayed wound healing, hematoma or damage to blood vessels, nerve damage, peripheral neuropathies, cardiovascular disorders, etc.).
DIRECTIONS FOR USE
-
- Examine the pre-op radiographs to estimate the inner diameter of the isthmus of the intramedullary canal of the proximal phalanx. Determined with a ruler and taking into consideration radiographic magnification, the inner diameter of the isthmus of the intramedullary canal should be at least 2.5mm to ensure that the 2.5mm arrowhead tip can pass through the narrowest point of the intramedullary canal in order to engage in the subchondral bone at the base of the proximal phalanx. Use the ruler to estimate the length of ARROW-LOK implant that will engage each phalanx at the intended location.
- Create a standard 3cm central incision over the surgical toe.
- Dissect through the skin and subcutaneous tissues down to the extensor tendon at the deep fascial level. Perform a transverse tenotomy/capsulotomy at the dorsal crown of the proximal phalanx. Dissect and transect the medial and lateral collateral ligaments away from the bone to expose the head of the proximal phalanx into the surgical site.
- Dissect the soft tissue away from the base of the intermediate phalanx, exposing the cartilaginous surface for resection and arthrodesis preparation.
- Resect the head of the proximal phalanx and the base of the intermediate phalanx.
- Smooth all rough edges of bone.
- Following resections, create a pilot hole down the center of the intramedullary canal of the proximal phalanx with the ARROW-LOK Reamer (Fig. 1). Use fluoroscopy to ensure proper placement. Measure the precise depth of the reamer with the ARROW-LOK Depth Gauge.

Figure 1
-
- Create a pilot hole down the center of the intramedullary canal of the middle phalanx with the reamer (Fig. 2).

Figure 2
-
- Prepare the pilot hole in the middle phalanx with the ARROW-LOK Broach carefully considering the depth estimated during pre-op planning. Broach until resistance is felt, usually between 7mm to 10mm. Note the insertion depth of the broach (Fig.3) as indicated by the depth marking. It is not necessary to broach the proximal phalanx. Grasp the ARROW-LOK implant with the ARROW LOK Insertion Forceps at the depth corresponding to the broaching depth of the proximal phalanx.

Figure 3
-
- Grasp the ARROW-LOK implant with the ARROW‑LOK Insertion Forceps at a distance from the end of the implant with the smaller 2.5mm arrowhead tip corresponding to the reamed depth in the proximal phalanx. Insert the smaller 2.5mm arrowhead tip into the reamed pilot hole until the implant is engaged in the dense subchondral bone at the base of the proximal phalanx (Fig. 4). It is recommended to use fluoroscopy to confirm proper placement.

Figure 4
-
- While keeping the insertion forceps engaged on the implant, grasp the digit and insert the distal aspect of the implant into the entry portal prepared in the middle phalanx (Fig. 5).

Figure 5
-
- Compress the two bones until they both touch the insertion forceps (Fig. 6). Release and remove the Insertion Forceps.

Figure 6
-
- Grasping the digit firmly, compress the two bones together to advance the implant both proximally and distally to its final and locked position. (Fig. 7)

Figure 7
- Radiographically evaluate the final positions of the implant and ensure that the proximal and intermediate phalanges are in close contact.
- Close the wound in accordance with generally accepted surgical technique.
PACKAGING
Only accept components if received with the factory packaging and labeling intact.
STERILIZATION
The ARROW-LOK implant is provided sterile and has been sterilized by gamma radiation. Devices are considered sterile unless the inner package has been opened or damaged.
NEVER steam sterilize or re-sterilize an ARROW LOK implant should it inadvertently become contaminated. The implant should be discarded according to hospital procedures.
Instruments are provided non sterile. Prior to use, the instruments should be removed from the packaging and shipping material. Prior to sterilization, the parts should be thoroughly cleaned. Parts should be manually cleaned using lukewarm water (between 27°C and 44°C) with an appropriate detergent that is labeled as safe for use on stainless steel. Follow the detergent manufacturer instructions as provided on the labeling. All parts can be wiped or brushed with a soft cleaning cloth or brush. The parts should be thoroughly rinsed after cleaning to remove debris and detergent residue. A final rinse with treated water (i.e. de-ionized, distilled or reverse osmosis water) is recommended. Dry with a clean, disposable, absorbent cloth. The parts should be visually inspected (internal and external) to assure cleanliness. If necessary, the steps above should be repeated until the part is visibly clean.
The cleaned instruments should be placed in the ARROW‑LOK instrument tray. The instrument tray is not a sterile barrier and must be wrapped. The following steps should be used to sterilize the components.
The specified sterilization parameters result in a sterility assurance level (SAL) of 10-6.
At any time, if any instrument appears to have any pitting, corrosion or other signs of degradation, the instrument should be disposed of or returned to the manufacturer and a replacement instrument should be used.
If alternative cleaning and/or sterilization methods are used, it is the user’s responsibility to qualify these methods as effective with the ARROW-LOK instruments.
STORAGE CONDITIONS
All implants must be stored in the original unopened packaging, away from moisture.
MANUFACTURER
Arrowhead Medical Device Technologies, LLC
328 Poplar View Lane East, Suite 2
Collierville, TN 38017
Phone: (901) 853-4366
Fax: (206) 222-9173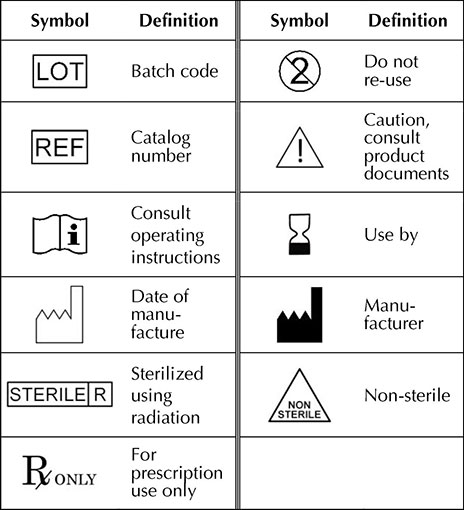
Literature #: IFU130202
Version: 1.1 [February 2013]
Attention Patients
Would you like your surgeon to use the ARROW-LOK Digital Fusion System for your hammertoe correction?
Call us at 470-419-1429 or email us and we will direct you to an ARROW-LOK surgeon.

